Installer Wizard (8 Steps)
The installer will guide you through a complete first-time setup in 8 steps. You can follow the steps in order. If a step fails, check the on-screen message and see the FAQ & Troubleshooting page.
/public, and ensure
folder permissions are correct (see
Requirements).
Steps Overview
- 1 Requirements
- 2 App Settings
- 3 Database Configuration
- 4 Migrations & Seeds
- 5 Channels
- 6 Admin Account
- 7 Branding
- 8 Finish
Step 1 - Requirements
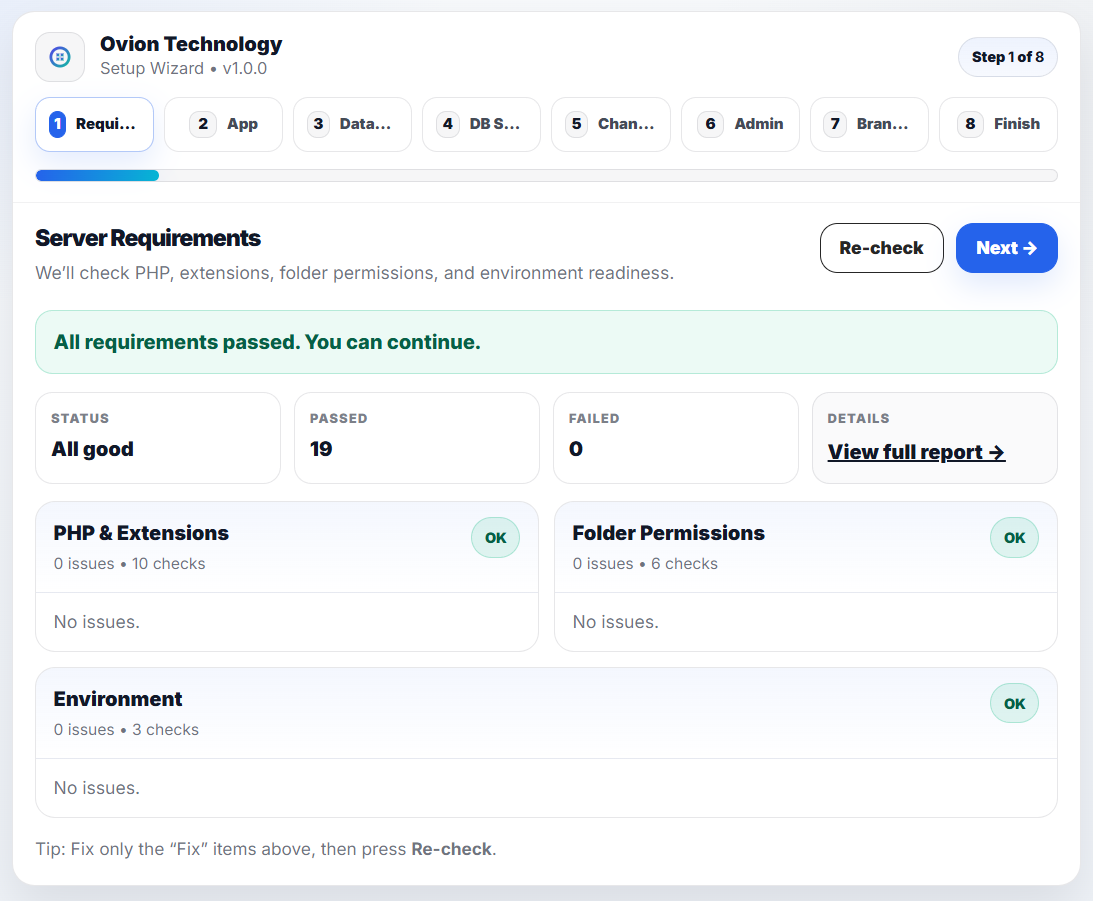
The installer checks your server requirements and folder permissions. If everything is OK, proceed to the next step.
PHP version, required extensions, and writable folders like
storage and
bootstrap/cache.
Fix the missing extension/permission and reload this step. Shared hosting may need support ticket.
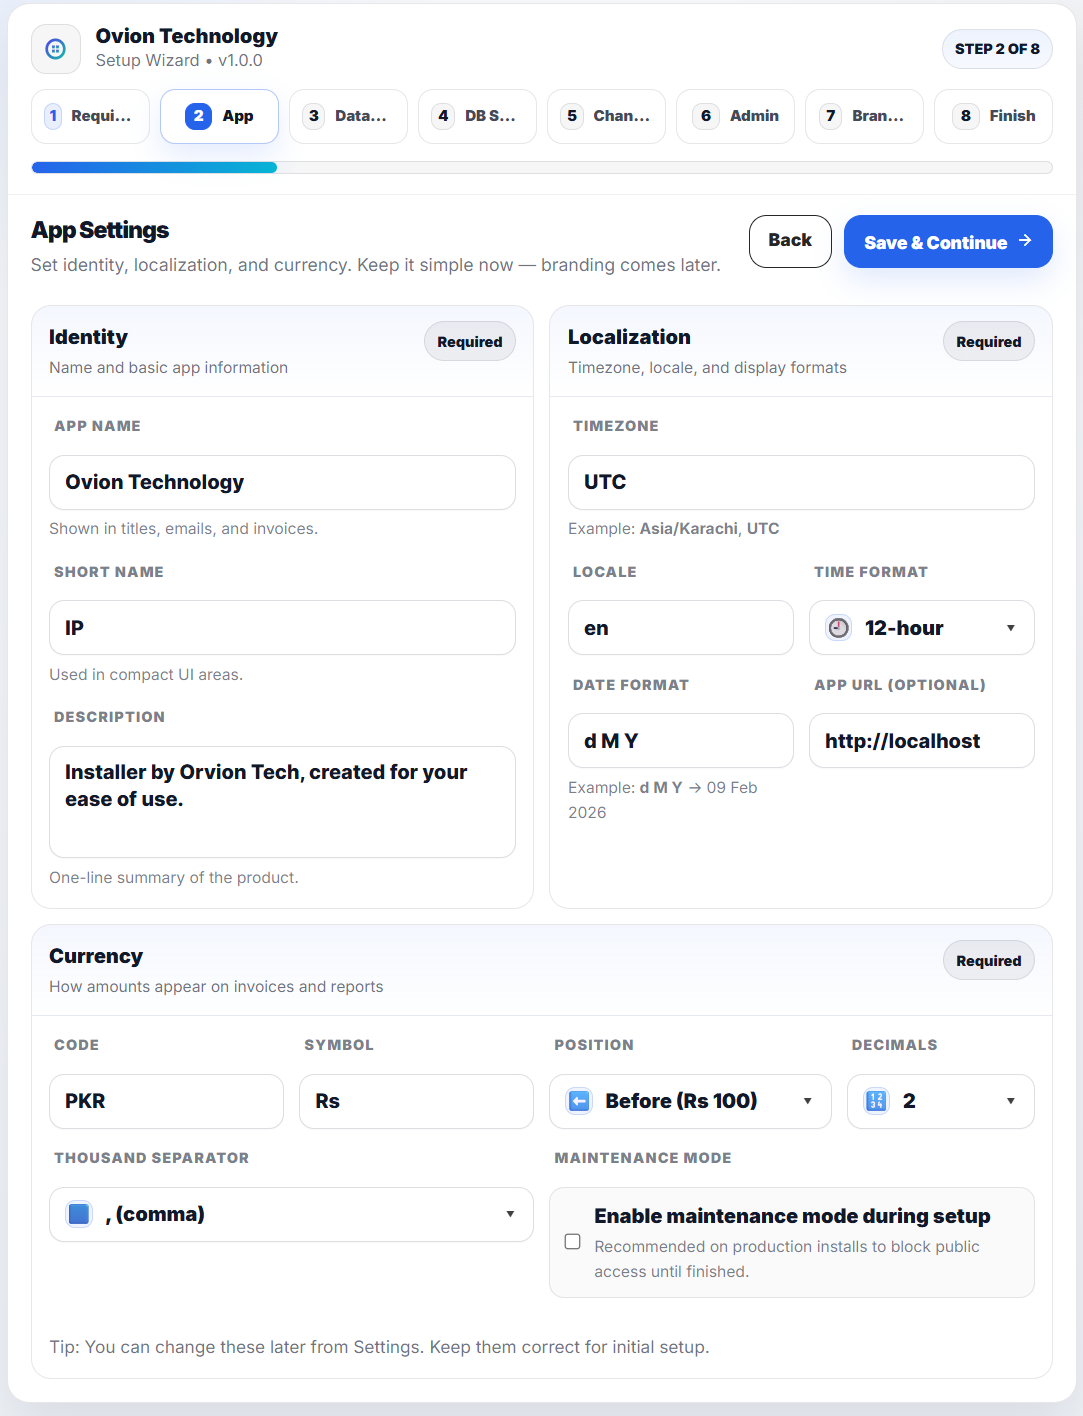
Step 2: App Settings
In this step, you will configure the basic identity, localization, and currency settings of your application. These settings define how your application appears to users and how data such as dates, time, and currency are formatted.
Basic application branding and naming information.
- App Name: The full name of your application. This name appears in page titles, emails, invoices, and system notifications.
- Short Name: A compact version of the application name. Used in small UI areas such as sidebars, headers, or mobile layouts.
- Description: A short summary of your application. This may be displayed in emails, dashboards, or metadata depending on configuration.
Configure how dates, times, and regional formats are displayed.
- Timezone: Select your server/application timezone (e.g., Asia/Karachi, UTC). This affects booking times, logs, and scheduled tasks.
- Locale: Defines the default language and regional formatting rules (e.g., en, fr, ar).
- Time Format: Choose between 12-hour or 24-hour display format.
- Date Format: Controls how dates are displayed (e.g., d M Y -> 09 Feb 2026).
- App URL (Optional): The full base URL of your application (e.g., https://yourdomain.com). This is important for asset loading, email links, and redirects.
Define how monetary values appear across invoices and reports.
- Currency Code: Standard 3-letter currency code (e.g., USD, PKR, EUR).
- Currency Symbol: The symbol used when displaying prices (e.g., $, Rs, EUR).
- Symbol Position: Choose whether the currency symbol appears before or after the amount (e.g., Rs 100 or 100 Rs).
- Decimal Places: Number of digits displayed after the decimal point.
- Thousand Separator: Select the character used to separate thousands (e.g., comma).
- Enable Maintenance Mode During Setup: When enabled, public access to the application will be temporarily restricted until installation is complete. This is recommended for production installations.
Step 3: Database Configuration
In this step, you will connect the application to your database. The installer will verify the connection and automatically prepare the database structure. Verification of the database connection is a prerequisite for the next step.
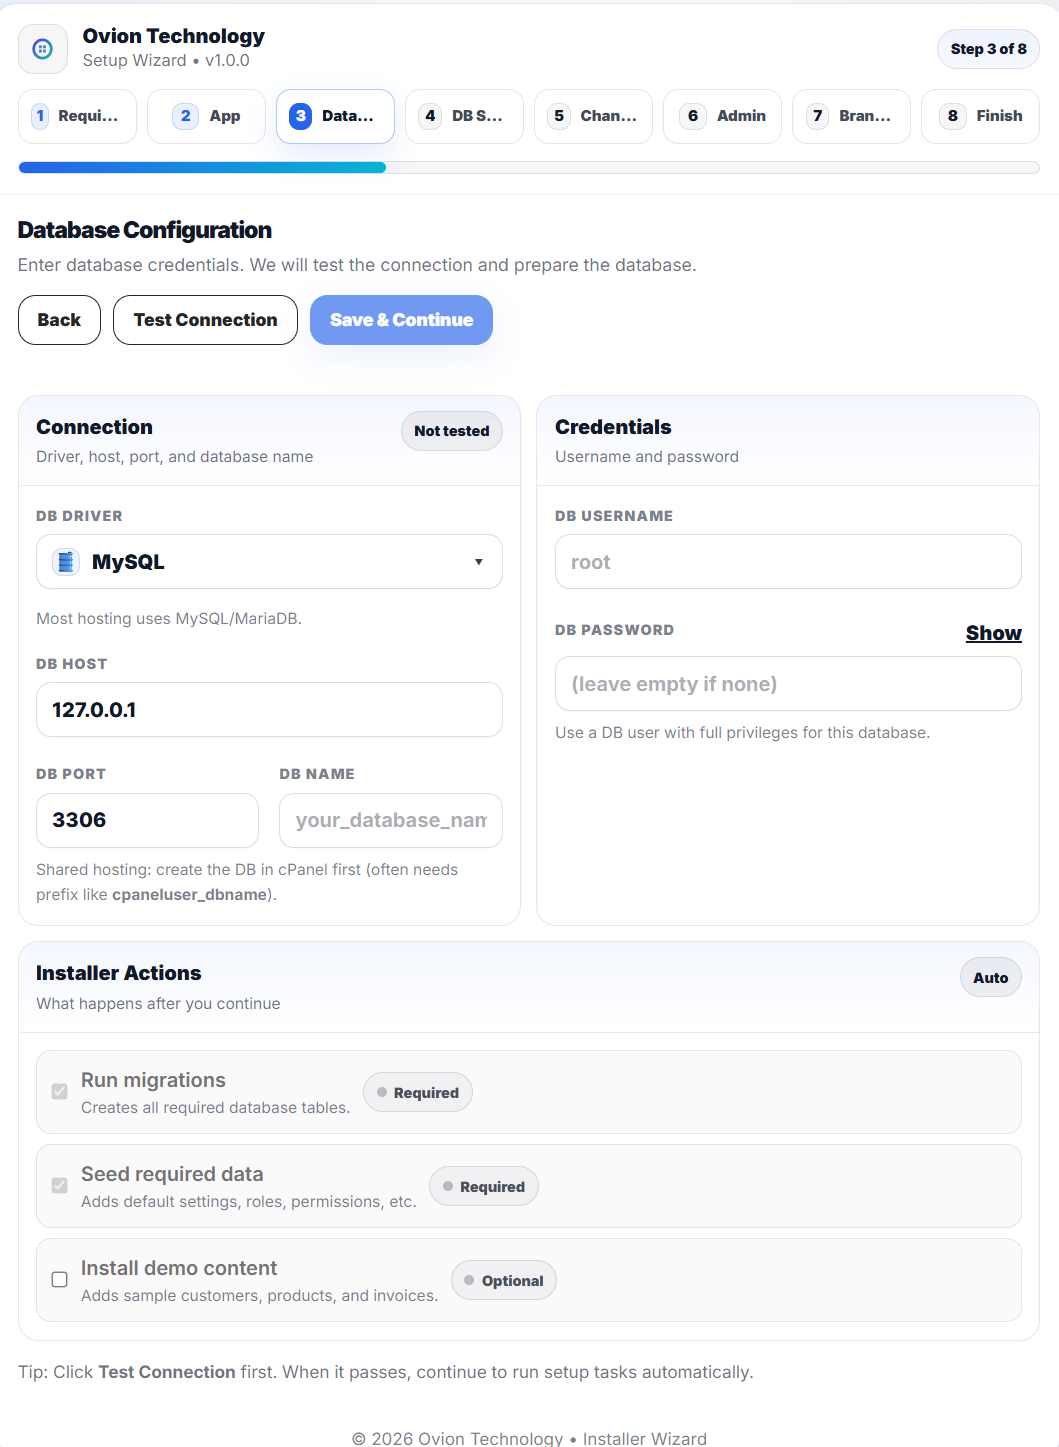
- DB Driver: Select your database type. Most hosting providers use MySQL or MariaDB.
-
DB Host:
Usually
127.0.0.1for local installations. On shared hosting, this may be different (check your hosting provider). -
DB Port:
Default MySQL port is
3306. Change only if your server uses a custom port. -
DB Name:
The exact name of your database. On shared
hosting, it may include a prefix (e.g.,
cpaneluser_dbname).
- DB Username: The database user created with access to the selected database.
- DB Password: The password for the database user. Leave empty only if your environment does not require one.
Click the Test Connection button to verify that the application can communicate with your database server.
If successful, you may proceed to the next step. If it fails, double-check your credentials and host settings.
After clicking Save & Continue, the installer performs the following actions automatically:
- Run Migrations (Required): Creates all necessary database tables.
- Seed Required Data (Required): Inserts default system data such as roles, permissions, and base configuration. Roles and permissions are implemented by using Spatie Laravel Permission package. Buyer package licensing is summarized in the root LICENSE.md file, and release history is tracked in the documentation changelog.
- Install Demo Content (Optional): Adds sample staff users, catalog records, purchases, stock outs, stock adjustments, and inventory activity for evaluation environments. Leave it unchecked for production-ready installs.
Step 4: Database Setup (Migrations & Seeds)
This step prepares your database automatically in a
safe, step-by-step manner. The installer verifies the
runtime environment, generates an application key when
needed, runs migrations, seeds the required baseline via
InstallerRequiredSeeder, and only seeds
demo content when that option was selected in Step 3.
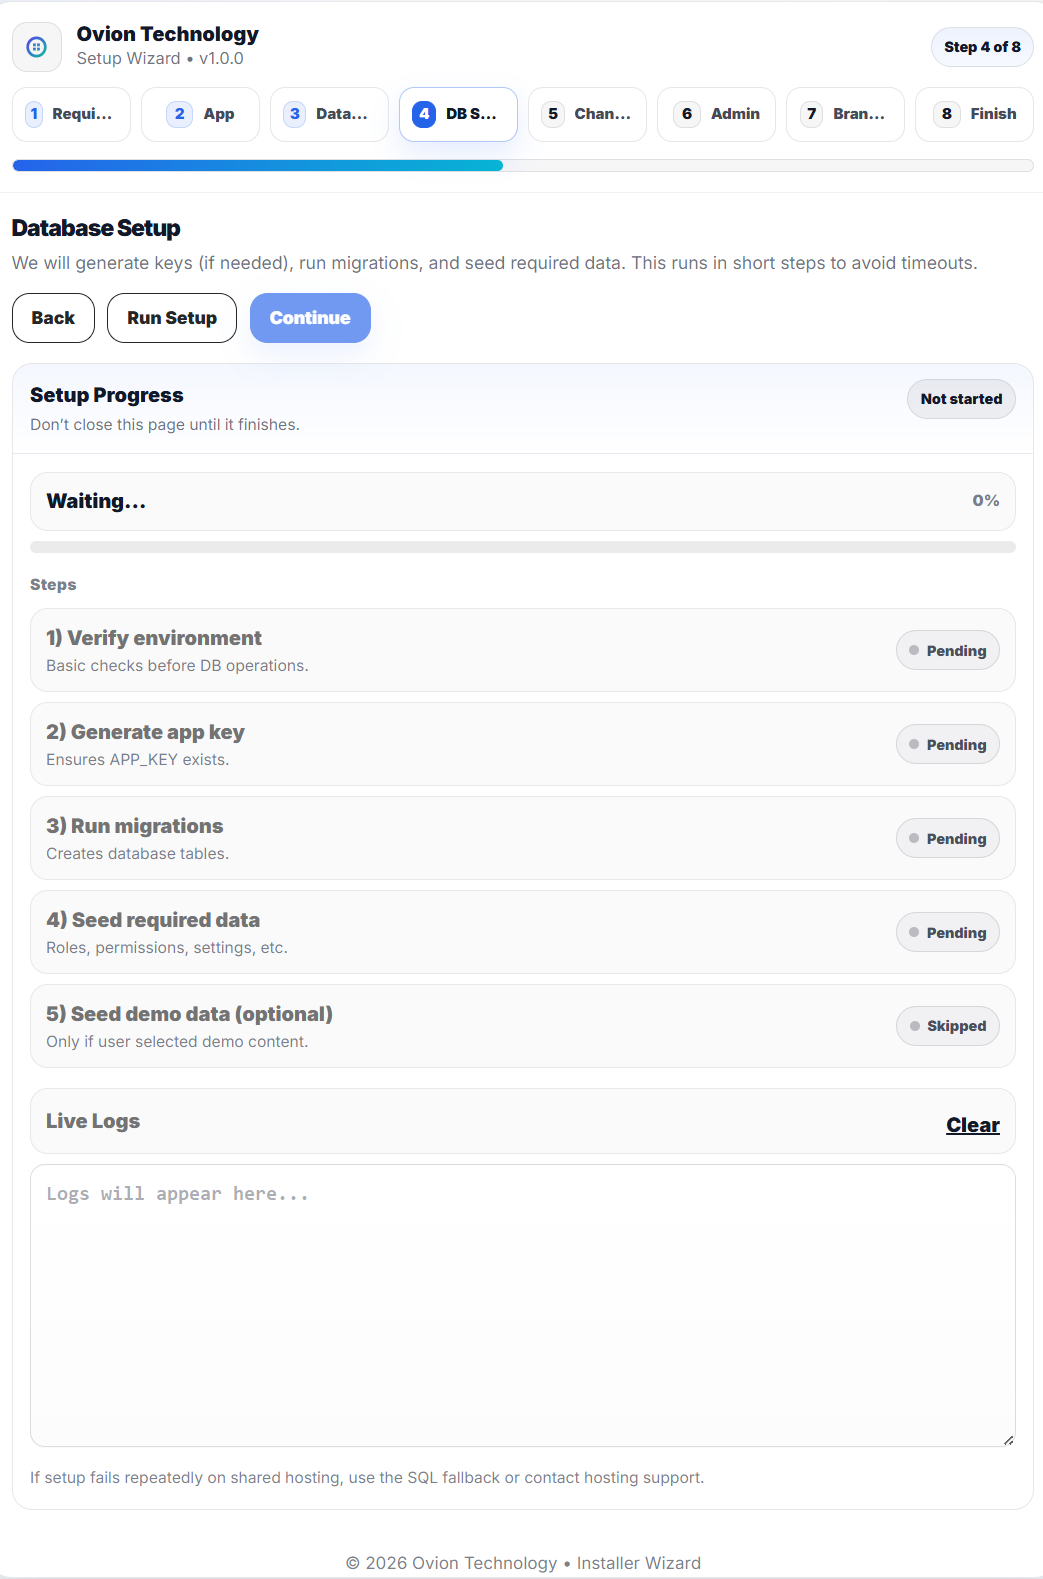
- Click Run Setup to start the database preparation.
- Watch the Setup Progress indicator for completion.
- Use the Live Logs box to monitor what is happening in real time.
- Once all tasks are complete, click Continue to proceed.
-
1) Verify environment
Performs basic checks before starting database operations. -
2) Generate app key
Ensures the application encryption key (APP_KEY) exists. If missing, the installer generates it automatically. -
3) Run migrations
Creates all required database tables and structures. -
4) Seed required data
Inserts the production-safe baseline such as default settings, essential roles and permissions, and measurement units. -
5) Seed demo data (Optional)
Adds sample staff, categories, suppliers, products, purchases, stock-outs, stock adjustments, and inventory activity only when demo content was selected in the previous step. If not selected, this task may appear as Skipped.
Step 5: Notifications & Channels
In this step, you will configure how the application sends notifications. Email (SMTP) is the primary channel used for admin alerts, OTP, password reset, and system emails. Optionally, you can enable SMS and WhatsApp notifications via Twilio. If you do not need SMS/WhatsApp right now, you can skip them and update later from the Settings panel.
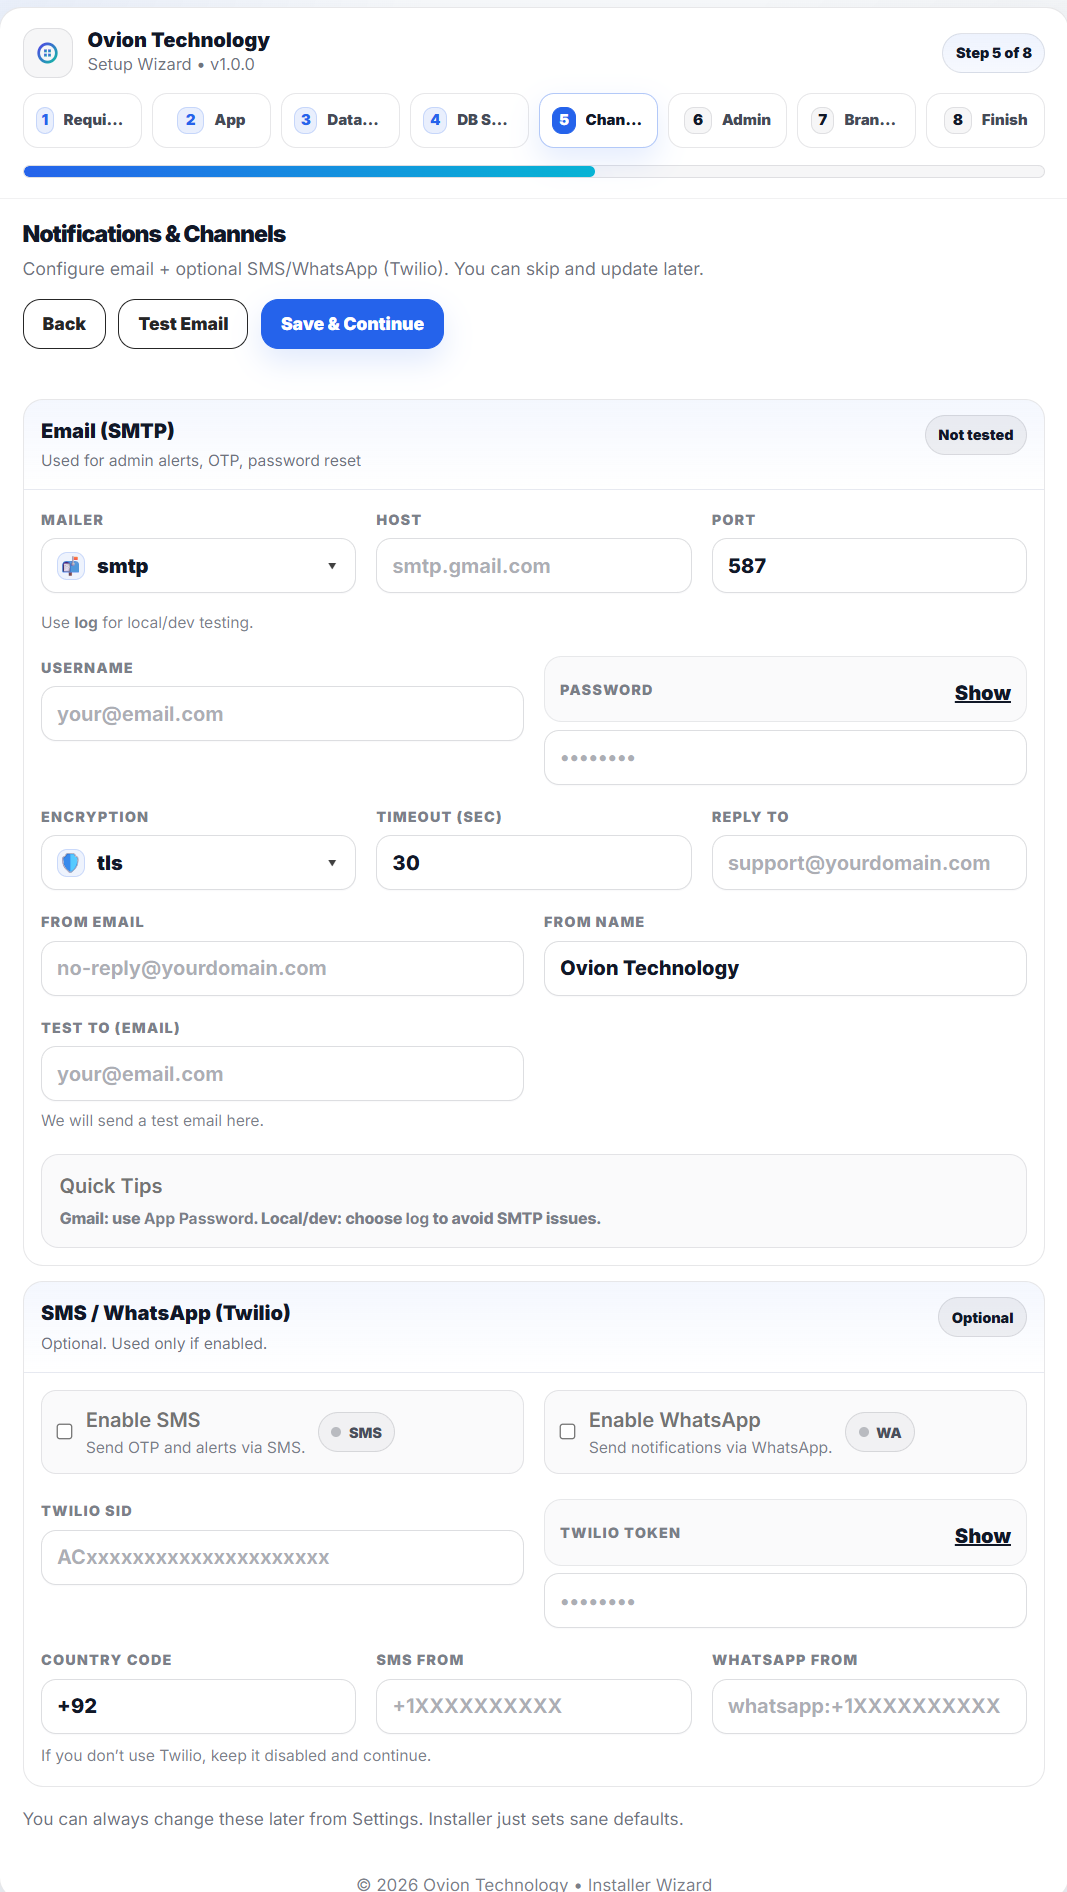
Used for admin alerts, OTP, password reset, and system notifications.
-
Mailer:
Choose the email driver. Use
smtpfor production. Uselogfor local/dev testing (emails will be written to logs). -
Host:
Your SMTP server host (e.g.,
smtp.gmail.com, your hosting SMTP, or a provider like Mailgun/SendGrid SMTP). -
Port:
SMTP port (common:
587for TLS,465for SSL). - Username: Your SMTP username (often your email address).
- Password: Your SMTP password. For Gmail, use an App Password (recommended) instead of your normal login password.
-
Encryption:
Select
tls(recommended) orssldepending on your SMTP provider. - Timeout (sec): Maximum time the system will wait for SMTP before failing the attempt.
-
Reply-To:
The email address users will reply to (e.g.,
support@yourdomain.com). -
From Email:
Sender email address shown in outgoing emails
(e.g.,
no-reply@yourdomain.com). - From Name: Sender name shown in outgoing emails (e.g., your company/app name).
- Test To (Email): The email address where the installer will send a test message. Use Test Email to confirm delivery.
log to avoid SMTP issues. For Gmail, use an
App Password and ensure "Less secure apps" is not
required.
Enable only if you plan to send OTP and notifications via SMS/WhatsApp. If disabled, the system will continue using Email as the primary channel.
- Enable SMS: Turns on SMS notifications (OTP, alerts) using Twilio.
- Enable WhatsApp: Turns on WhatsApp notifications using Twilio WhatsApp sender.
-
Twilio SID:
Your Twilio Account SID (starts with
AC...). - Twilio Token: Your Twilio Auth Token (keep it private).
-
Country Code:
Default country code used when formatting phone
numbers (e.g.,
+92). -
SMS From:
Your Twilio sender number (e.g.,
+1XXXXXXXXXX). -
WhatsApp From:
Your Twilio WhatsApp sender (format:
whatsapp:+1XXXXXXXXXX).
Step 6: Create Admin Account
In this step, you will create the first administrator account for the system. This user will be responsible for managing the application after installation, including modules, settings, staff, and security options.
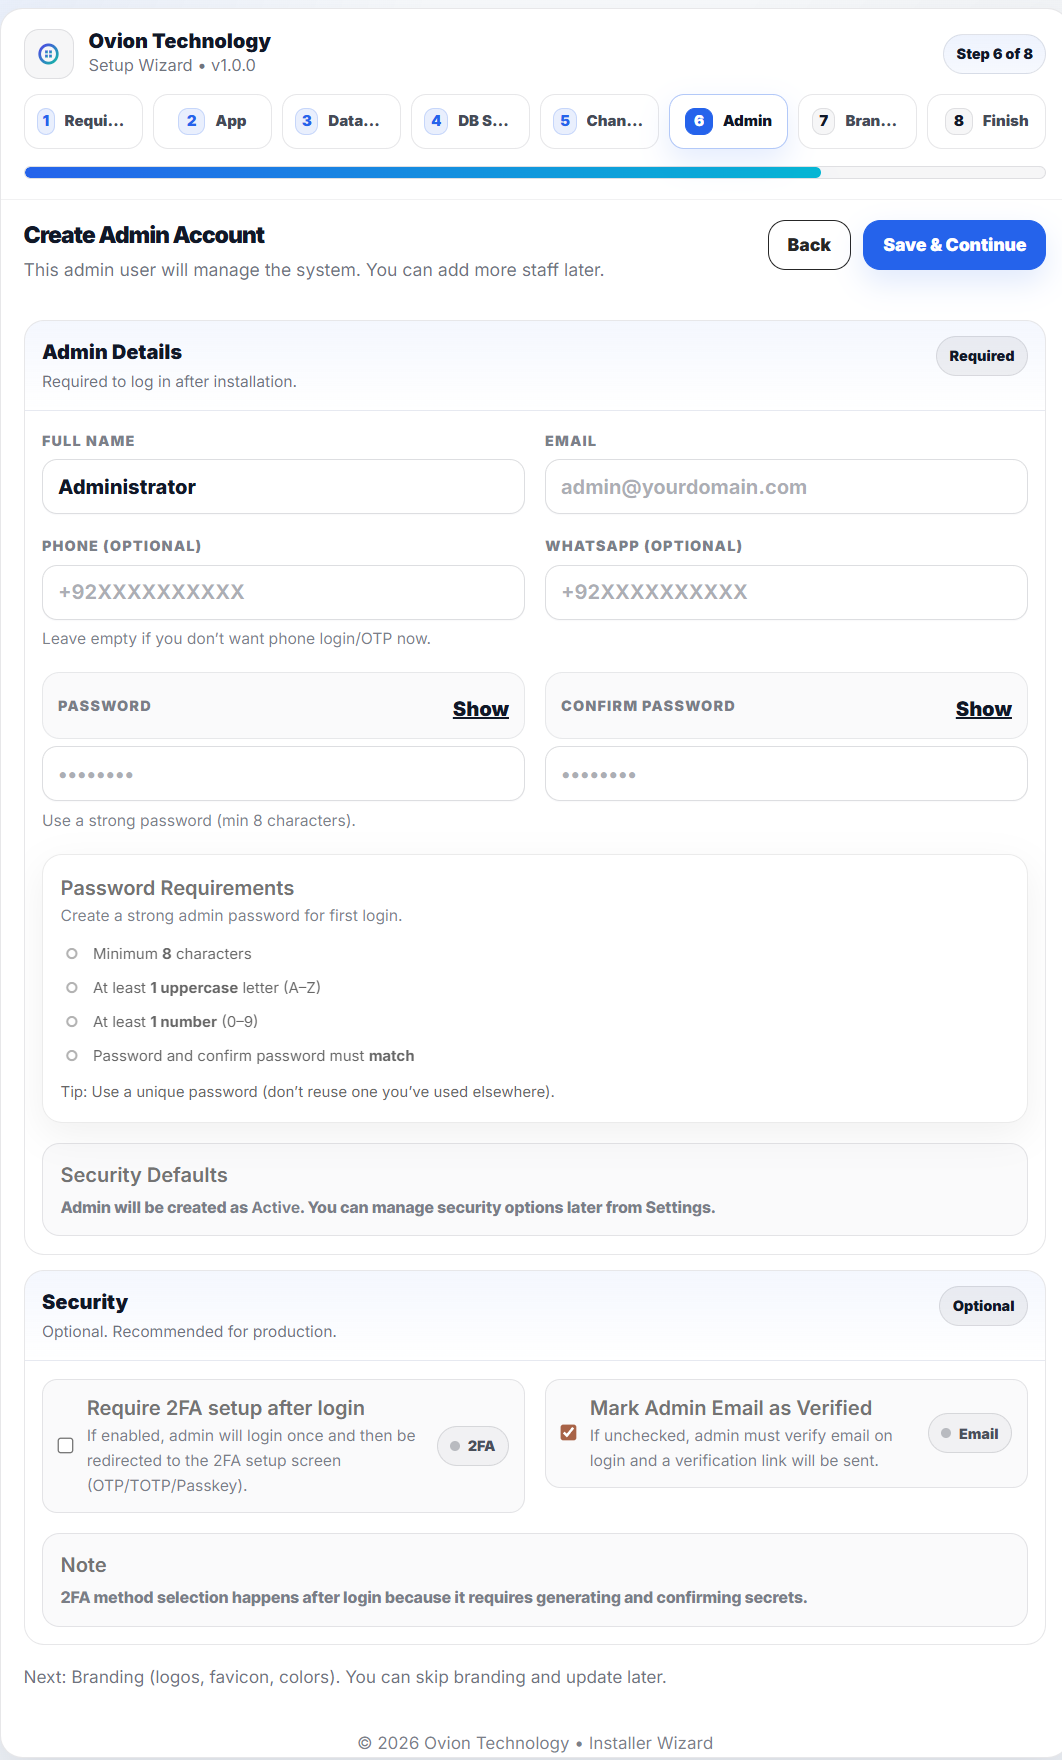
Required to log in after installation. Optional phone fields can be used later for phone login/OTP if enabled.
- Full Name: The display name of the administrator account.
- Email: The primary login email for the admin. Used for password reset, verification, and system alerts.
- Phone (Optional): Optional phone number for future phone-based login or OTP workflows. You may leave this empty if not required.
- WhatsApp (Optional): Optional WhatsApp number for future WhatsApp notifications (if enabled in Channels).
- Password: Create a strong password (minimum 8 characters). It is recommended to use uppercase letters and numbers for better security.
- Confirm Password: Must match the password exactly.
- Admin Role (Assigned Automatically): The user created in this step is automatically assigned the Admin role by default and receives full access to manage the system.
These settings are recommended for production installations and can be changed later.
- Require 2FA setup after login: If enabled, the admin will log in once and then be redirected to set up 2FA (OTP/TOTP/Passkey) for stronger account security. For 2FA login, smtp needs to be setup correctly otherwise 2FA will not work and admin will be unable to log in. It is recommended to either setup smtp or disable 2FA setup in this step.
- Mark Admin Email as Verified: If enabled, the admin email will be treated as verified immediately. If disabled, a verification process may be required on first login.
Step 7: Brand Assets & Appearance
In this step, you will upload your brand assets (logos, favicon, and default avatar) and configure the application's visual preferences such as primary/secondary colors, sidebar theme, and app mode. These settings help match the system to your brand identity. You can skip branding during installation and update everything later from the Settings module.
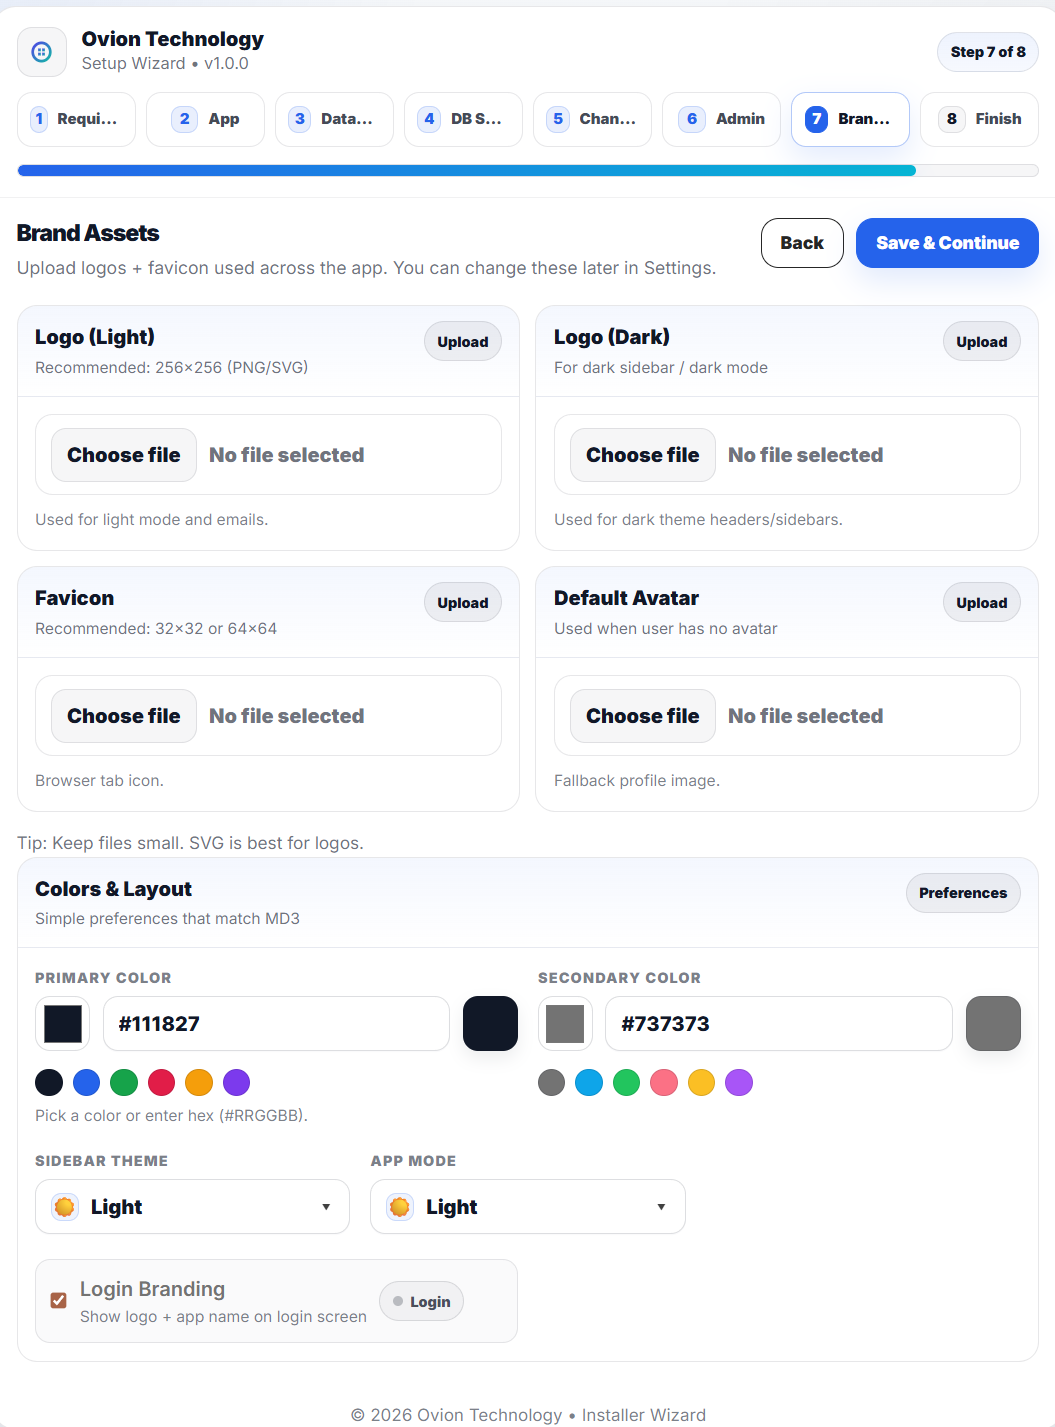
These files are used across the application UI, emails, and browser tab icon. Keep assets optimized for best performance.
- Logo (Light): Used for light mode UI and emails. Recommended: 256x256 (PNG/SVG).
- Logo (Dark): Used for dark sidebars / dark mode headers. Recommended: 256x256 (PNG/SVG).
- Favicon: Small icon shown in the browser tab. Recommended: 32x32 or 64x64 (PNG/ICO).
- Default Avatar: Fallback profile image used when a user has not uploaded an avatar.
Set the application theme colors and layout preferences. These values affect buttons, highlights, and overall UI styling.
-
Primary Color:
Main brand color used in buttons, links,
highlights, and UI accents. You can pick from
presets or enter a HEX value (e.g.,
#111827). -
Secondary Color:
Supporting color used for secondary elements,
muted UI accents, and decorative highlights. You
can pick from presets or enter a HEX value
(e.g.,
#737373). - Sidebar Theme: Controls the sidebar style (Light / Dark). Useful when your logo is optimized for a specific background.
- App Mode: Controls the overall application appearance (Light / Dark). Users may also switch later if supported.
- Login Branding: When enabled, the login screen displays your app name and logo for a branded sign-in experience.
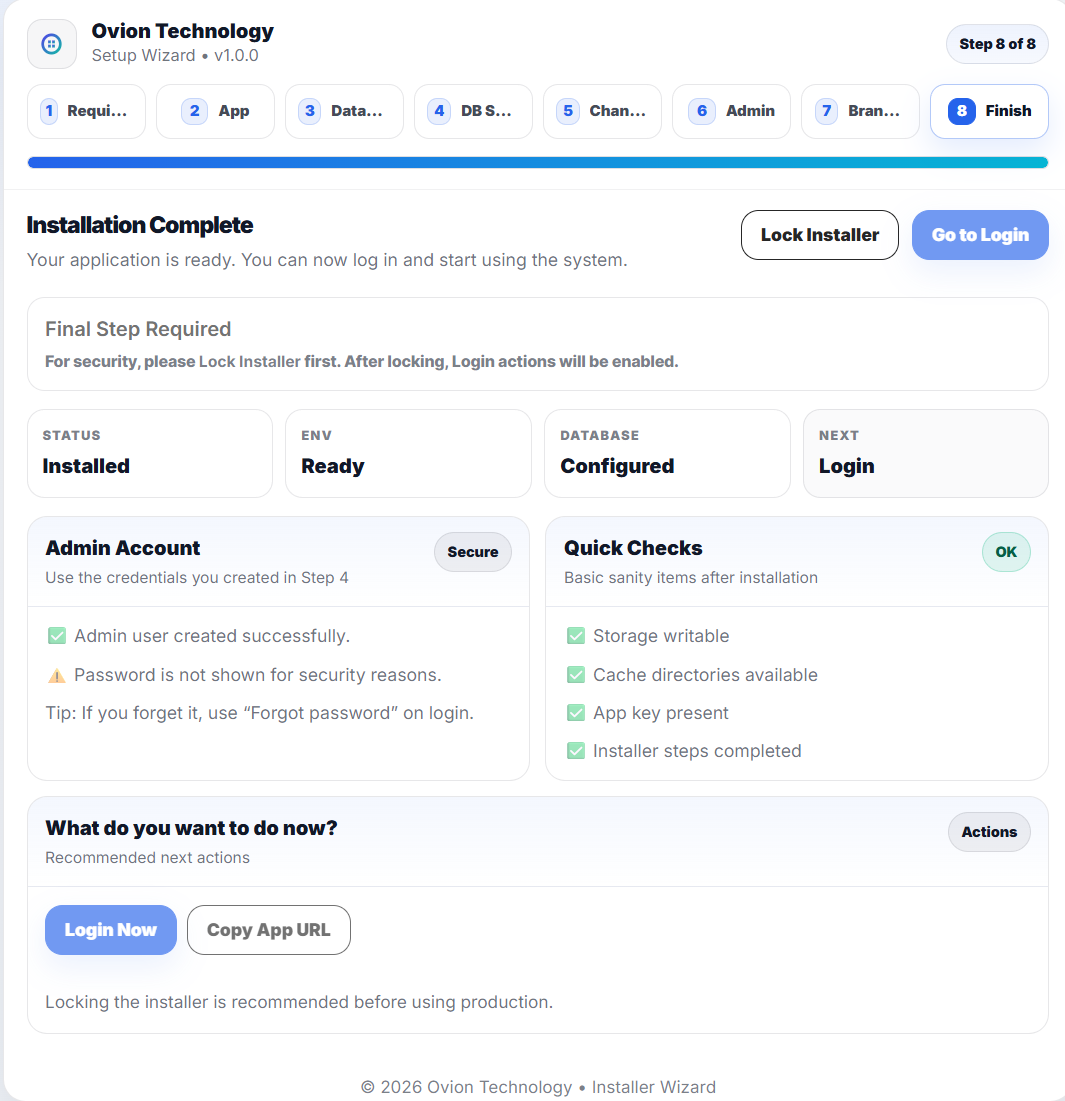
Step 8: Installation Complete
Congratulations. Your application has been successfully installed. All required checks, database setup, and configuration steps have been completed. You can now secure the installer and start using the system.
- Refresh Database: an admin tool that clears catalog, transaction, and demo-account data while preserving settings and the current signed-in user.
- Reinstall: a fresh installer run against an intentionally reset database and unlocked installer state.
- Use Refresh Database for cleanup. Use a reinstall only when you actually need to rebuild the application from installation state.
- Status: Installed successfully.
- Environment: Ready.
- Database: Configured and migrated.
- Next Step: Login.
- Admin user created successfully.
- For security reasons, the password is not displayed.
- Storage directory is writable
- Cache directories are available
- Application key generated
- All installer steps completed
- Click Lock Installer to secure the installation.
- Click Go to Login to access your dashboard.
- Review Settings, Roles & Permissions, and basic system configuration.